

Mother’s Day Gift Ideas from www.tasteofhome.com
The gifts that Mom cherishes most are the ones hand-crafted by her own kids. When you present Mom with a mouth-watering breakfast in bed or a lovely lunch at the kitchen table, have the kids make their mark with a one-of-a-kind tray or table topper.
Make a card
Instead of buying a greeting card, enlist the little ones to make a card at home. Or have them draw a pretty picture and place it in a frame. (Inexpensive canvas or paper-covered photo frames are available at craft stores.)
Fresh flower arrangement
Fresh-picked daisies bring a touch of spring inside ... and a kid-crafted vase is the perfect way to display the bright bouquet!
While you start making the meal, have the kids hunt down some of their marbles and place them in a regular drinking glass. Tuck daisy stems into the marbles, then fill with water.
For an even more colorful arrangement, place a decorative ponytail holder around the marble-filled glass. Slide crayons between the glass and holder until the entire glass is covered.
More gifts from www.homemadesimple.com
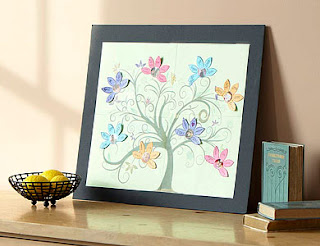

Family Tree Calendar
Every family is unique, and with this simple crafts project, you can honor your personal genealogy with endless creative possibilities. Begin by downloading the Family Tree Branch Template and Family Tree Leaf Template to construct your tree, then let your artistic side take the reins to craft a one-of-a-kind masterpiece.
MATERIALS
4 sheets 8 ½” x 11” paper, all same color (weight, style and color of your choice*)
1 additional sheet of paper for every 6 tree leaves (weight, style and color of your choice*)
Family Tree Branch Template
Family Tree Leaf Template
Scissors
Clear tape
Writing utensils (pens, pencils, markers)
Photos of loved ones
Glue stick
Spray adhesive
1 large sheet poster stock, matte board or cork board
Embellishments (beads, sequins, scrapbook stickers, tags, ribbon) *Using a variety of papers will lend texture and interest to your Family Tree Calendar. Because you will construct individual leaves for each member of your family, try pulling from an assortment of paper designs and colors when printing your leaf templates. Find inspiration in your home décor palette, or consider it a way to reflect your loved ones’ personalities.
INSTRUCTIONS
- On each of your first 4 sheets of paper, print out one section of the downloadable Family Tree Branch Template.
- Use scissors to trim each image along the margins. Align the branch designs to tile together the image, then fasten the pieces together along the back with clear tape.
- Use your extra paper sheets to print out the downloadable Family Tree Leaf Template. Each sheet yields six leaves, so determine the number of leaves you would like for your tree and continue reprinting the template on additional sheets.
- Carefully cut out the leaves with scissors and use a pen or decorative marker to write down your loved ones’ information on each of the leaves.
Tip: Consider each leaf as a different person, with the five petals showcasing different pieces of information. For example, dedicate a leaf to your mother, writing her first name, last name, birth month, birth date and birth year on the five petals. Your family tree is also perfect for anniversaries, upcoming weddings and other special events. Try honoring a betrothed couple by writing the bride’s full name, the groom’s full name, the location of the wedding ceremony, the date of the ceremony and the time on individual petals.
- Next, use scissors to trim photos of loved ones so their headshot will fit within the center of their leaf. Adhere the picture to the leaf with your glue stick.
- Using your glue stick or clear tape, adhere the leaves onto the tree image. Envision each of the four tree quadrants as a three-month span, with the bottom left-hand quadrant representing January, February and March. Moving clockwise, the upper left-hand segment represents April, May and June, and so on. Locate the dates on each of your leaves and adhere them to the corresponding region. Apply a spray adhesive to your sheet of poster stock, matte board or cork board, then mount your family tree to the material for extra stability. Complete your Family Tree by embellishing the piece with decorative touches like beads, sequins and stickers, as desired. For an extra polished look, try framing the piece, or adhere ribbon along the calendar’s border.
Homemade Stationery
Create something beautiful and useful out of paper scraps, magazines, junk mail and more. Transform those clutter piles into handmade cards and envelopes perfect for a sweet spring greeting, thoughtful hello or heartfelt Mother’s Day wish next month. You can also gather your recycled crafts to create unique homemade gifts sets—ideal for anyone who loves to stay in touch in style!

From Trash to Treasure
With loads of junk mail flooding your mailbox each day, it’s important to sort and recycle the unwanted pieces. But instead of tossing those brochures, magazines and offer letters directly into the recycling bin, try repurposing them into brand new sheets of paper that you’ll surely treasure and want to share.

To create your paper base, use only non-waxy, non-glossy junk mail and paper scraps. Just follow these easy downloadable instructions for Hand Pressed Paper to get started.
Easy, Eclectic Envelopes
Next, design easy-to-make envelopes to match your recycled paper theme. For an eclectic, almost collaged look, pull from a variety of sources, such as leftover decorative paper, wrapping paper, maps, magazines and newsprint. Put your recycled craft together and make construction a snap by downloading our instructions and Easy, Eclectic Envelope Template.


Gift Sets
After you’ve created your recycled crafts, consider packaging your pieces together in special homemade gift sets for loved ones. Turn to your calendar and check for upcoming occasions, like friends’ birthdays.
- Personalize: With these simple recycled crafts projects, it’s easy to tailor your pieces to reflect your loved ones’ personalities and interests; for example—repurpose songbook pages for a musical friend, collect maps from an atlas or old book for an avid traveler, or reuse pages from old cookbooks or food magazines for the master cook in your life.
- Package: Compile four to six cards and envelopes for each stationery set, fastening your homemade gift packs with a complementary ribbon. You can even package your items in an organized way that allows you to use even more paper scraps. Take a plain wooden desk organizer from drab to fabulous using decorative paper and glue. Once you’re done, fill the decorated desk organizer with recycled cards, envelopes, pads of paper and a few writing utensils so your friend can start corresponding in a beautifully organized way.
With simple steps and endless creative options, it’s easy and fun to repurpose paper clutter into beautiful paper goods for you and your friends.
Wearable Memories
Keep the things you love close to your heart with these stylishly simple pendant necklaces. All of the necessary supplies should be available at your local craft or jewelry making store and it’s the pieces you arrange inside your pendants that make them uniquely your own! It’s a special collage craft project with results that you and your home maven friends can treasure for many years to come.

Getting Started
Have your friends collect a few small, flat items that are meaningful to them for a day of jewelry making fun! Possible items could include anything from pieces that remind them of a friend or family member to representations of hobbies and special interests or just items they find pretty and unique.
Here are a few examples:
- Photos
- Images from magazines
- Words from books or poetry
- Decorative papers and patterned print-outs
- Stamps
- Tiny buttons
You’ll provide the metal pendant trays in different sizes and shapes such as circles, rectangles and squares and a paper glaze for capturing your collages of keepsakes inside the pendants. For all the supplies you will need, just print this handy Keepsake Necklace Materials List.
Step 1: Create Your Crafting Space
Before your friends arrive, choose a clean, flat table you can use as your work surface. Lay down a drop cloth or plastic and tape securely onto your table to protect it from any possible glaze drips. Arrange the tools you’ll need on the table such as pendants, scissors, glaze, old spoons or forks and notebooks or magazines. Each person will use a notebook or magazine as their level work surface as they arrange their items and apply the glaze.
Step 2: Arrange Your Keepsakes
Each person can spend as much time as needed to arrange the items they want to capture in their pendant. It’s a good idea to start with a background of some sort, such as a solid or patterned piece of decorative paper. Make sure to provide scissors or craft knives so your friends can cut their pieces to sizes and shapes that will fit snugly inside their pendants. Lighter-colored papers may soak up the glaze and discolor,so make sure to test your paper before creating your final design.
Everyone will basically create a miniature collage inside their pendant, using as many or as few items as desired. Just make sure your arrangements lie relatively flat so the glaze can be applied over top. Use a small amount of the glaze to adhere your items to the pendants rather than glue. Different compounds mixing can cause the colors of the items to bleed. Use the handle end of an old spoon or fork to smooth out any bubbles or ridges that appear on the items .you are gluing down
.
Before adding the topcoat of glaze, you can also add a small amount glitter on top of your collage to create a little sparkle. Also, while the glaze is still wet you can move or change your
arrangement.
Step 3: Apply the Glaze
After you’ve made your desired arrangement, it is time to apply the layer of glaze. Lay your pendant flat against the notebook or magazine with the loop over the edge so the pendant stays completely level. Apply an even coat of glaze, in a very thin layer. Try not to let too much glaze build up around the edges of the pendant. Too much glaze at once can cause cloudiness.
Using the handle end of your old spoon or fork, smooth out any bubbles or ridges you find in your glaze. You can either leave the pendants where they are or carefully move them to an area where they won’t be jostled so they are allowed to dry evenly. Check on your pendants after a short while so you can pop any bubbles that come up and make sure the paper is not discoloring.
Step 4: Wrap it up

The glaze that is used to set the collage in the pendants will likely take several hours to dry (up to 24 hours for some). Check the directions on the bottle of glaze for specific timing and
keep the pendants on a flat surface that’s out of the way while they dry.
Once the glaze has dried after the party, wrap them up for delivery. Choose a chain or cord for the pendants and place each one inside a pretty piece of fabric tied with a ribbon. Bring them to your next get together and admire your handiwork.
Clean Up:
Wipe away any glaze messes with Mr. Clean ® Magic Eraser ®. A foaming multi-purpose cleaner is built inside so you just add water to clean even the toughest soils.
Homemade Spa Recipes from www.tasteofhome.com
Avocado Facial Mask
Avocados make a moisturizing mask that's nourishing for dry or sun-exposed skin.
1 avocado, peeled and seeded
2 tsp. sweet almond oil or virgin olive oil
1. Mash avocado and add oil.
2. Apply mixture to face and leave on 15 to 20 minutes.
3. Rinse with lukewarm water and pat dry with towel.
Salt Glow
Salt scrubs are among my favorite home spa treatments. This one leaves your skin soft and glowing.
1/4 cup coarse salt (sea salt or kosher salt)
2 Tbsp. virgin olive oil
3-4 Tbsp. lemon juice
Directions:
1. Mix salt and oil.
2. Add lemon juice.
3. Massage into skin while you shower.
4. Rinse, pat dry and apply a natural moisturizer.
Gentle Oatmeal Mask
This is a good face mask for oily skin. The recipe makes enough for one treatment and should be applied as soon as it's mixed.1 Tbsp. honey (runny)
1 egg yolk
4 Tbsp. fine oatmeal
Directions:
1. Mix honey and egg yolk together in a small bowl.
2. Slowly stir in enough oatmeal to make a soft paste.
3. Smooth mask across face and neck and keep on for 15 minutes.
4. Rinse off with lukewarm water and pat dry with towel.
Eye BrightenersPlace a slice of cucumber over each eye. Lie back and relax for 15 minutes while cucumber tones and soothes skin around the eyes.
Take two tea bags and make tea. Gently squeeze out the brewed tea bag and let cool. Place one slightly damp bag over each eye. Chamomile is good for tired eyes, while Indian tea (such as Darjeeling), an astringent, will firm the skin.
Golden Oat Pancakes and Green Onion Scrambled Eggs deliciously prove that great-tasting foods don't require complicated recipes. (See May Recipes for these recipes)
(sorry for the caps here, format is going crazy on me)
We even offer a timetable that makes menu planning extra easy!
One Week Before:
Come up with the menu and make a grocery list.
Have the kids make a card or draw a picture for Mom. (If desired, pick up an inexpensive photo frame for the drawing.)
Look at home for a breakfast tray or pick one up from the store. You don't have to use a tray with legs...any tray (even a plastic one for outdoor entertaining) will do.
Stop at the grocery store for any needed items.
Put marbles in a drinking glass. Surround with a ponytail holder and crayons if desired. Hide the glass from Mom!
Make Lemon-Blueberry Tea Bread (see May recipes) and cool completely. Store in a resealable plastic bag on the counter overnight.
Combine the flour, baking powder, brown sugar and salt for Golden Oat Pancakes. Place in an airtight container; store at room temperature.
Get up early with the kids and let Mom sleep in!
Have older kids add water and fresh-cut flowers from your yard to the marble-filled drinking glass; set on the breakfast tray along with the kid-crafted greeting card or framed drawing.
Make Fruit Smoothies or pour Mom a cup of coffee, orange juice or her favorite morning beverage.
While the Golden Oat Pancakes are cooking on the griddle, prepare Green Onion Scrambled Eggs in a skillet.
Top the pancakes with fresh fruit or syrup.
Serve Mom breakfast in bed!
No comments:
Post a Comment